Friday July 2 2021
Install windows to the drive first with nothing else on it, feel free to allow it to take up all the space and create partitions as needed.
Once this is done, don't bother turning on bitlocker just yet, we're going to install Ubuntu first. If you previously turned on bitlocker, you can turn it off and wait for decryption to complete, then follow along with this guide.
Boot into the installer, I'm using Ubuntu 20.04 LTS at the moment, click to try Ubuntu instead of installing it directly, we're going to drop into the command line for a little bit.
root@ubuntu:~# lsblk /dev/sda
NAME   MAJ:MIN RM   SIZE RO TYPE MOUNTPOINT
sda      8:0    0 465.8G  0 disk
├─sda1   8:1    0   100M  0 part
├─sda2   8:2    0    16M  0 part
├─sda3   8:3    0 465.2G  0 part
└─sda4   8:4    0   505M  0 part
root@ubuntu:~#
Your drive layout will be similar to what is above assuming you have a somewhat modern system configured to use EFI boot. I'm not covering BIOS boot here, as even my nearly eight year old ThinkPad X230 has UEFI capabilities.
We're going to first resize sda3, where windows is actually installed.
In my case, I'm going to set it to be a little bit smaller than the final
partition size, and let ntfsresize take care of expanding it in a minute (
245G )
root@ubuntu:~# ntfsresize -s 245G /dev/sda3
ntfsresize v2017.3.23AR.3 (libntfs-3g)
Device name        : /dev/sda3
NTFS volume version: 3.1
Cluster size       : 4096 bytes
Current volume size: 499453583872 bytes (499454 MB)
Current device size: 499453585920 bytes (499454 MB)
New volume size    : 245000000000 bytes (245000 MB)
Checking filesystem consistency ...
100.00 percent completed
Accounting clusters ...
Space in use       : 56834 MB (11.4%)
Collecting resizing constraints ...
Needed relocations : 0 (0 MB)
WARNING: Every sanity check passed and only the dangerous operations left.
Make sure that important data has been backed up! Power outage or computer
crash may result major data loss!
Are you sure you want to proceed (y/[n])? y
Schedule chkdsk for NTFS consistency check at Windows boot time ...
Resetting $LogFile ... (this might take a while)
Updating $BadClust file ...
Updating $Bitmap file ...
Updating Boot record ...
Syncing device ...
Successfully resized NTFS on device '/dev/sda3'.
You can go on to shrink the device for example with Linux fdisk.
IMPORTANT: When recreating the partition, make sure that you
  1)  create it at the same disk sector (use sector as the unit!)
  2)  create it with the same partition type (usually 7, HPFS/NTFS)
  3)  do not make it smaller than the new NTFS filesystem size
  4)  set the bootable flag for the partition if it existed before
Otherwise you won't be able to access NTFS or can't boot from the disk!
If you make a mistake and don't have a partition table backup then you
can recover the partition table by TestDisk or Parted's rescue mode.
root@ubuntu:~#
Now to use fdisk to alter the partition table from something like:
Device         Start       End   Sectors   Size Type
/dev/sda1       2048    206847    204800   100M EFI System
/dev/sda2     206848    239615     32768    16M Microsoft reserved
/dev/sda3     239616 975734900 975495285 465.2G Microsoft basic data
/dev/sda4  975736832 976771071   1034240   505M Windows recovery environment
To to something along the lines of
Device         Start       End   Sectors  Size Type
/dev/sda1       2048    206847    204800  100M EFI System
/dev/sda2     206848    239615     32768   16M Microsoft reserved
/dev/sda3     239616 524527615 524288000  250G Microsoft basic data
/dev/sda4  524527616 528721919   4194304    2G Linux filesystem
/dev/sda5  528721920 843294719 314572800  150G Linux LVM
Pay careful attention to the partition type for sda3 being "Microsoft basic
data", fdisk will usually default to a "Linux" filesystem type.
I haven't filled the rest of the disk here with the Linux LVM
partition, you are welcome to, I'm leaving some room for OpenBSD, which is
optional.
Now lets go ahead and expand windows to fill that partition and clear the dirty flag that will otherwise have windows nagging us for a disk check:
root@ubuntu:~# ntfsfix -d /dev/sda3 && ntfsresize /dev/sda3 && ntfsfix -d /dev/sda3
Create the LUKS container:
root@ubuntu:~# cryptsetup luksFormat /dev/sda5

WARNING!
========
This will overwrite data on /dev/sda5 irrevocably.

Are you sure? (Type uppercase yes): YES
Enter passphrase for /dev/sda5:
Verify passphrase:
root@ubuntu:~# cryptsetup luksOpen /dev/sda5 crypt
Enter passphrase for /dev/sda5:
root@ubuntu:~#
Now we're going to create the physical volume, volume group, and logical volumes underneath of it:
root@ubuntu:~# lvm pvcreate /dev/mapper/crypt
  Physical volume "/dev/mapper/crypt" successfully created.
root@ubuntu:~# lvm vgcreate vg /dev/mapper/crypt
  Volume group "vg" successfully created
root@ubuntu:~# lvm lvcreate vg --name root --size 25G
  Logical volume "root" created.
root@ubuntu:~# lvm lvcreate vg --name home --size 100G
  Logical volume "home" created.
root@ubuntu:~# mkfs.xfs /dev/vg/root
< TRIMMED OUTPUT >
root@ubuntu:~# mkfs.xfs /dev/vg/home
< TRIMMED OUTPUT >
root@ubuntu:~#
Note that you can skip the home steps above if you don't want them to be
separate filesystems. The volume group is also not full with this configuration.
You are welcome to fill it if you'd like, but if it's full you will not be able
to snapshot the filesystems. ( An example
script )
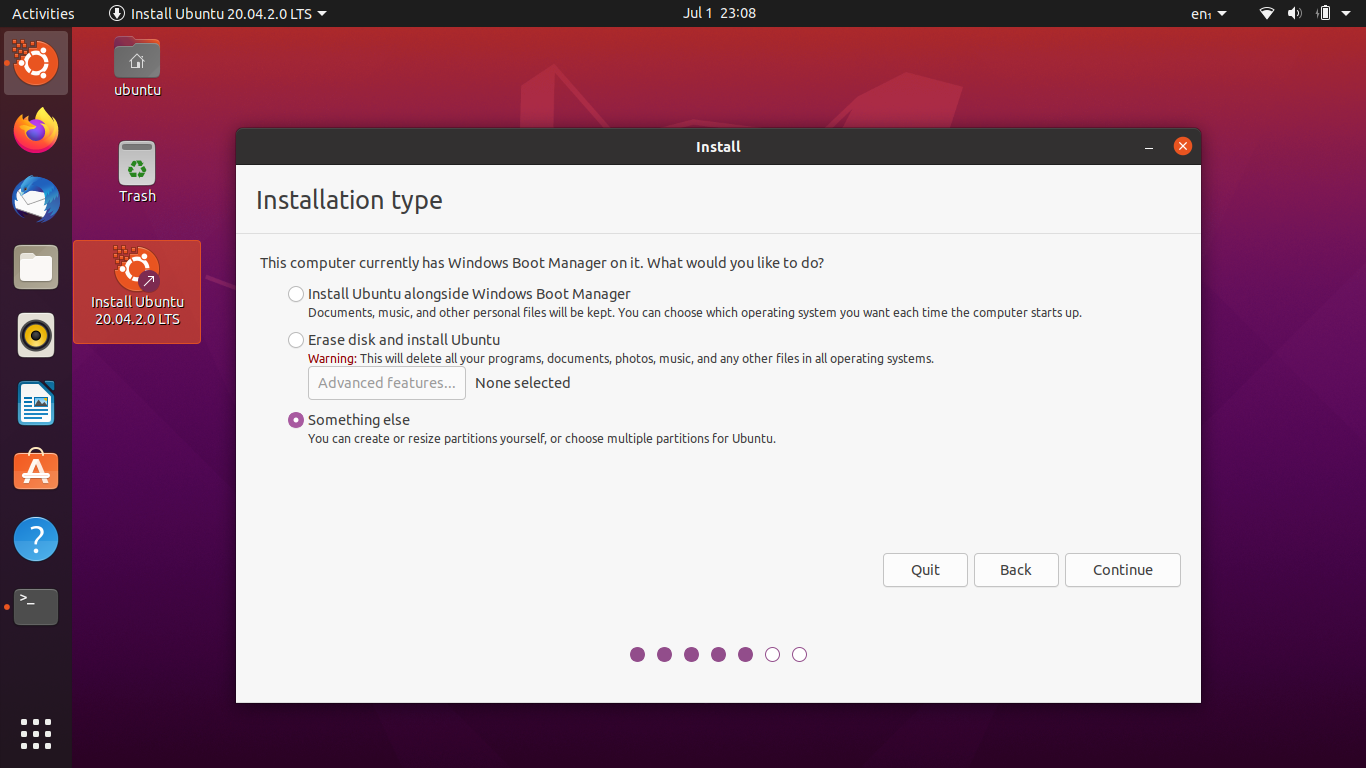
The install process isn't too different from the normal Ubuntu install, but we're going to be selecting the "Something else" option:
We're going to select the XFS filesystem we just created to be mounted on /:
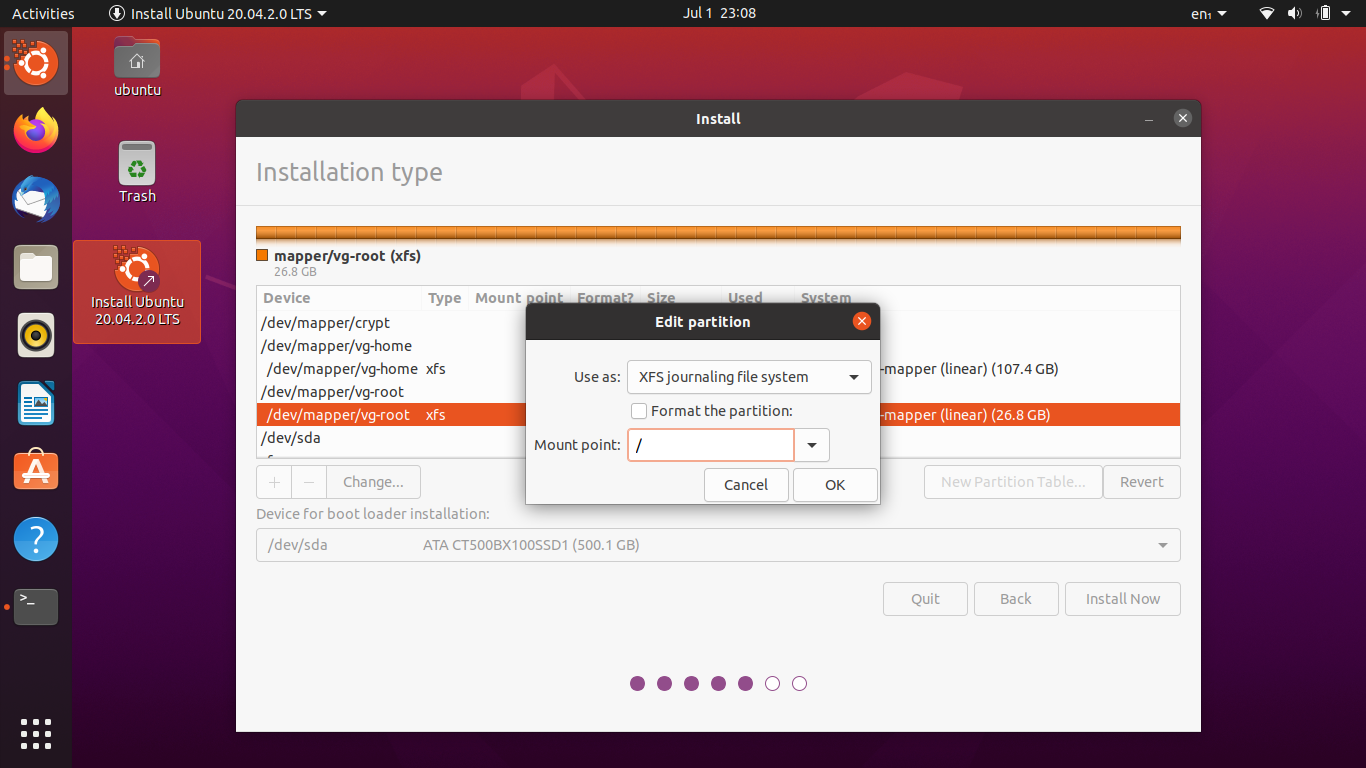
Do the same thing for /home if you've created a home file system in the
volume group.
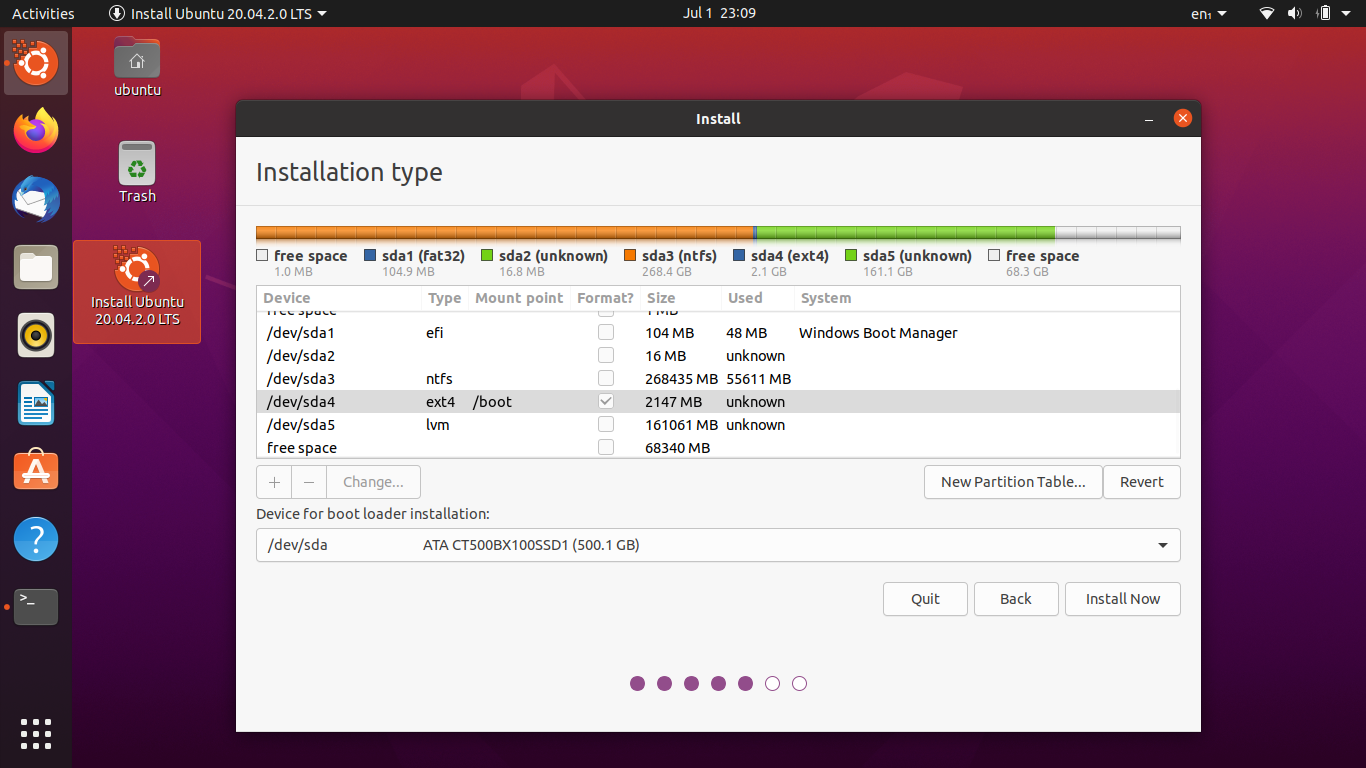
Now we're going to select the partition for /boot
Since we've not formatted the LVM filesystem, you may get a warning about it:
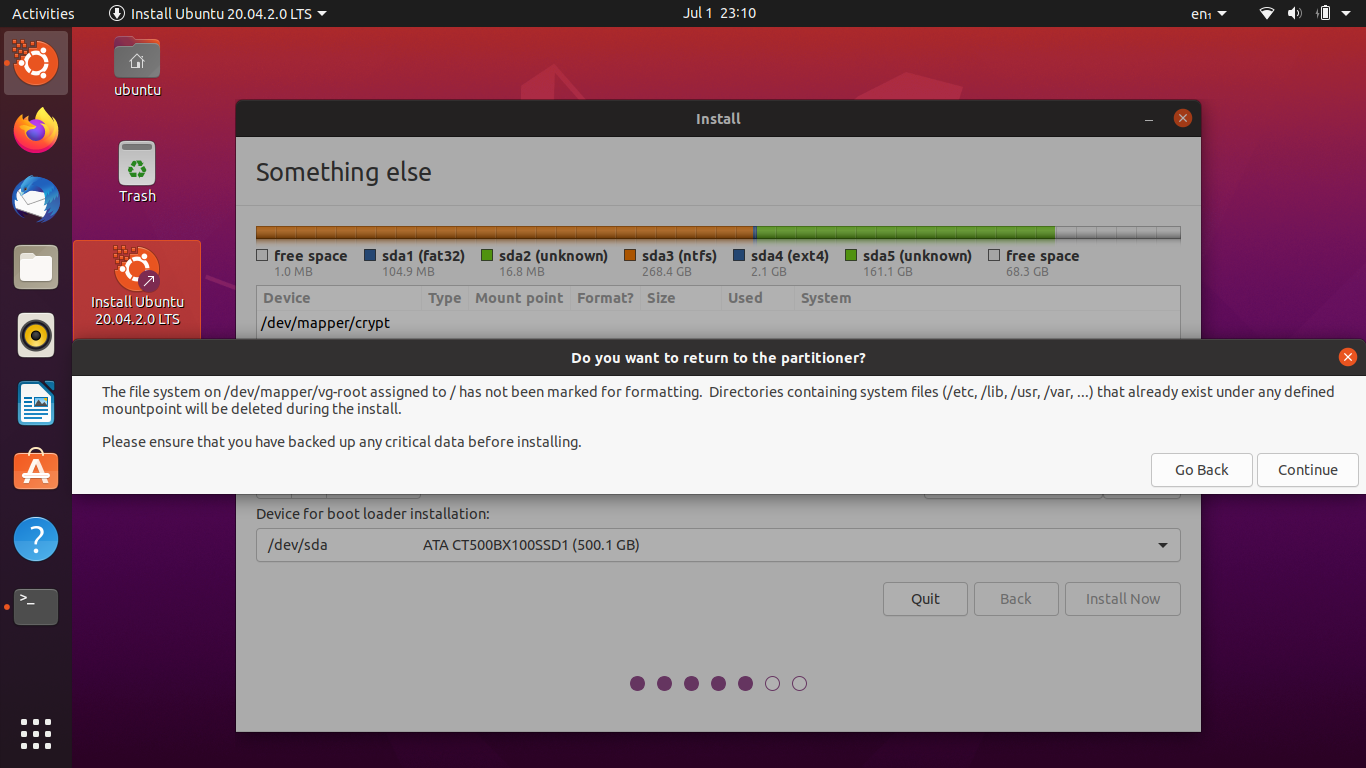
This you can safely ignore.
Take note of what device the encryption volume is on, in my case /dev/sda5
When Ubuntu starts for the first time it's going to drop you to an emergency shell where you'll have to unlock the disk and enable the volume group by hand until we fix it:
(initramfs) # cryptsetup luksOpen /dev/sda5 crypt
(initramfs) # lvm vgchange -ay
(initramfs) # exit
Now Ubuntu should continue to boot like normal. Once you're at the desktop,
pop open a terminal and edit /etc/crypttab:
crypt UUID=<UUID> none luks
Be sure to replace <UUID> with your UUID from ls -l /dev/disk/by-id | grep sda5. ( Or similar if your encryption volume is say /dev/nvme0n1p5 or so )
Now rebuild the initramfs and update grub:
root@x230:~# update-initramfs -ck all && update-grub
You should now be able to reboot like normal and get prompted for your disk password.
From Windows. Once that's done everything should work as expected. You have both an encrypted Windows and Linux install.
Go back to your Windows installation medium, click troubleshoot, and then go to a command prompt.
From the command prompt we're going to "mount" the EFI partition by assigning a drive letter to it, remove the old BCD file, and create a new one with the following commands:
( Everything in <> is something you'll replace, anything after # are
comments )
# This will drop us in the diskpart CLI
> diskpart
> list disk
> select disk <number>
> list part
> select part <number> # This will be the EFI partition, usually 100mb
> assign LETTER=Z
> exit
>
> cd /d Z:\EFI\Microsoft\Boot
> del BCD
> bcdboot C:\Windows /l en-us /s Z: /f ALL